Ready to dive into the wonderful world of rock painting? Whether you’re looking to express your artistic flair or simply enjoy the therapeutic benefits of painting, this guide will take you through the steps of painting rocks.

~This post contains affiliate links.
1. Gather Your Rock Painting Materials
Alright, first things first. Before we begin, make sure you have all the essentials for rock painting. Don’t worry, the basic list is not too long. Although the possibilities are endless when it comes to the extras, I only added a few to spark some ideas.
Basic Materials:
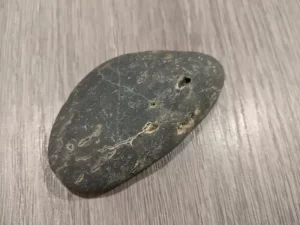
Rocks or stones
The main canvas for your rock painting. Choose smooth and flat rocks of various sizes and shapes.
If you want to dig deeper, here is a blog post about finding and selecting rocks.
Acrylic paint
Acrylic paint is versatile and great for rock painting. I love using craft paint as they are affordable. I also use student-grade acrylic paint for more pigment and slightly thicker consistency.
I suggest you start with the five basic colors(red, blue, yellow, white, & black). Here is my article that might convince you why.
Paint brushes
You’ll need a set of synthetic paintbrushes. Get a mix of sizes so you can paint big and small details on your rocks. Just like with paint, there’s craft or student-grade brush. In another blog post, I talk about everything you need to know when picking the brush for each job.
Palette or plastic lids or an old plate.
Find something to mix your paint on. You can use a fancy palette, but recycled plastic lids or an old plate works just fine.
Pencil or colored pencil (Optional)
Used for sketching or outlining your designs on the rocks before painting.
This is optional for those who can sketch using a paintbrush.
Cup of water or Brush rinser
A cup of water and a rag, or a store-bought brush rinser will be used to clean your paint brushes between colors or when you’re finished painting.
Clear coat
If you plan to display your painted rocks outdoors, applying a clear coat on top can protect the paint from the elements and provide a glossy finish.
Extras
And here are the additional materials that can add some extra flair to your rock painting experience and/or outcome:
Wet palette
It’s a fancy palette with a lid that keeps your paint wet for longer. Great for those who like to take their time.
Markers
Permanent markers can be used for creating outlines or adding fine details to your rock paintings. Acrylic paint markers can also make your life easier when it comes to outlines and fine details. Just be careful when as they may smudge when sealed.
Hair dryer
A hairdryer can be used to speed up the drying process between layers of paint.
Wood filler
Wood filler can be used to fill any cracks or crevices on the rocks and create a smooth surface for painting. They can also be used to add a base or reshape your rocks.
Masking tape
Can be used to create clean edges or mask off specific areas while painting.
Foam brushes
I love using foam brushes when applying a base coat or sealant on the rocks. You can also use any flat brush.
Miscellaneous items such as a magnet sheet, brooch, googly eyes or fancy boxes can be used to give stones another purpose.
2. Prepare the Rocks
Now that you have your rocks, it’s time to give them a little TLC. We’ll clean them up, smooth out any rough edges, and even apply a primer if you’d like. Trust me, these simple steps will make a huge difference in the final result!
If you want to learn more, I have an entire blog post about preparing rocks for painting.
3. Sketch the Design on the Rock
Use a pencil or colored pencil to outline your design. If you are not good at drawing yet, here are some alternatives such as tracing and more.
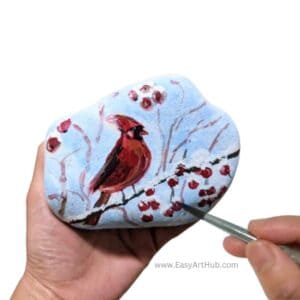
4. Have Fun Using Basic Painting Techniques
Now the fun part, let’s dive into some basic painting techniques.
Before we start painting the design on the rock, we got a chance to play with colors.
It’s all about exploring and finding what looks awesome to you.
A bit of a color theory, as you will learn in this post, can come in handy here. With that, we can make tons of colors using just the 5 basics and create unique combinations.
Start with the first layer and gradually add depth and dimension by blending additional colors. I explained how the basics of how to blend colors here. I also have a butterfly tutorial that focused on this basic technique.
Once your background layers are dried, you can add the details. You can use detailing brush or acrylic pens to do this. Don’t forget to apply shadows and highlights, you won’t believe how easy it is to make things pop up.
5. Add Your Finishing Touch (optional)
Now, if you want to take your rock painting game to the next level. You can add magnets, brooches, and googly eyes. Let your imagination run wild and make your creations truly unique.
5. Seal the Rocks (Optional):
Sealing is the way to go if you plan to display your rocks outdoors or want to ensure their longevity. It’s an extra step that’s worth it!
If you’re wondering what and how to seal your precious art, check this out. If you are not ready to invest in these commonly used sealers/varnish yet, you can use clear nail polish with some caveat.
Rock painting is a delightful hobby that allows you to unleash your artistic side and create unique works of art. By following the steps outlined in this guide, you’ll be well on your way to mastering the art of rock painting.
Helpful Tips
- Use a stick to avoid touching the wet paint while painting.
- Outline using a wet small brush dipped in a tiny bit of black paint.
- Use a permanent marker to create the outline. If you are going to seal, be careful.
- Make sure to let it dry before applying the next layers.
- Patience. You will need some.
- Wondering what to do with painted rocks? I have about 20 ideas here. It includes garden decor, gifts, paperweights, and more.
Hope this quick guide will help start your rock painting journey. See you in the next painting tutorial!
Happy painting!